VB Lecture Notes - Graphics
Objective #1: Obtain and work with common graphics file types.
- Most types of graphics can be used in PictureBoxes. I recommend that you use gif and jpg graphics since they can easily be found on the Web (e.g. http://images.google.com ) and are sure to work with Visual Basic.
On a Windows PC, the file's graphic type can be determined by the file extension at the end of the file's name. If a file is named logo.gif then the file is a gif file. If it is named logo.jpg then it is a jpg file.
- gif - Files of type gif are best for clip art, cartoon pictures and other illustrated graphics that have relatively few colors (e.g. a pacman graphic).
- jpg - Files of type jpg are better for digital camera photos or images with rich, varied color (e.g. the picture of a sunset).
- png - Files of type png (pronounced "ping") are popular on the Internet
Here is a great article explaining the differences between these three graphics file types - http://lifehacker.com/learn-when-to-use-jpeg-gif-or-png-with-this-graphic-1669336151
- To save a graphic to your computer on a Windows PC, you can right-click over the graphic and choose the Save Picture As menu command to place the graphic in your My Pictures folder. On a Macintosh computer, either right-click or Ctrl-Click to save a graphic.
- You can download graphics from the Internet though there are copyright
issues to be aware of. Some websites
allow you to use clip art for free. From other websites, the graphics are protected by copyright and you are not allowed to use a graphic in anything that you publicly distribute. However, if you
are using the graphic for a project in this VB course and the instructor is the only person that will see the graphic for grading purposes, then you may use the graphic in your VB project. The law provides an exception allowing you to use copyrighted material in certain educational reasons.
Objective #2: Use graphics with PictureBox objects.
- A PictureBox object can be used to display a graphic. The prefix pic is used for PictureBox objects.
- You can click the browse button that appears in the Image property of a PictureBox to make a graphic appear in the PictureBox. I recommend that you choose "Project resource file:" option that comes up in the Select Resource dialog box rather than the "Local resource:" option. The Project resource file option embeds a copy of the graphic into your project folder so you'll have access to it even if the original graphic is deleted or moved from its location (i.e. probably your My Pictures folder).
- As outlined at http://visualbasic.about.com/od/usingvbnet/a/netres090117.htm, another way to add a graphic file (such as a jpg or a gif) to your project is to
- right-click the project in the Solution Explorer
- click the Add command
- click Add Existing item
- browse your computer to find & select the graphic file tha tyou want to add to your project
- change the Build Action property for the graphic file resource to "Embedded Resource"
- The SizeMode property of a PictureBox can be changed to StretchImage to allow you to resize the graphic.
- If you selected added an image to a picture box using the "Project resource file" method as outlined above, you can change the graphic that is displayed in a picture box during run-time with the statement:
picPlayer.Image = ProjectName.My.Resources.Resources.pacmanright
The reference to pacmanright above would need to be replaced by the name of the graphic file that you added to your project without its file extension. If the name of the file is logo.jpg then you would replace pacmanright with logo. Also, you must type the name of your project in place of ProjectName in the example above. If your project's name includes blank spaces you must replace each blank space with an underscore character ( _ ). For example, if your project is named Hello World then ProjectName must be replaced by Hello_World.
- To clear an image from a picture box, use the statement
picGraphic.Image = Nothing
- Some graphics have annoying backgrounds that prevent the graphic from blending in nicely with your form's background color. If the graphic is a gif, see this tutorial to learn how
to make it transparent if you have access to the Graphics program Fireworks. Otherwise, you can try using the free website online-image-editor.com and/or picresize.com to do so. You may also want to resize the graphic using a graphics program to reduce the filesize of the graphic.
- You will not be tested on the following technique but it may be useful in projects or assignments. Other than selecting an image by browsing your computer as explained above, another way to load an image into a picture box run-time is by using the statement
picPlayer.Image = Image.FromFile(Application.StartupPath + "\pacmanright.gif")
or
picPlayer.Image = Image.FromFile(System.AppDomain.CurrentDomain.BaseDirectory() + "pacmanright.gif")
can
be used as well. However, this requires that you place an actual copy of the graphic file (named pacmanright.gif in this example) in your project's bin/Debug folder since that this where the application's exe file is located.
- You will not be tested on the following technique but it may be useful in projects or assignments. A graphic can be rotated during runtime with the RotateFlip method. See the demo program in the Handout folder for more details.
Dim bmImage As New Bitmap(picPlayer.Image)
bmImage.RotateFlip(RotateFlipType.Rotate180FlipY)
picPlayer.Image = bmImage
Objective #3: Use color with objects.
- Using predefined color constants in the Color class you can assign colors various objects. This allows you to use a multitude of colors including Color.Red,
Color.Blue, and even Color.HotPink. For example, to set the background color of a PictureBox, you can use the statement
picPlayer.BackColor = Color.Blue
You can set the background color of the form itself using the statement
Me.BackColor = Color.Blue
The keyword Me must be used to refer to the form rather than the actual name of the form such as Form1.
- You can also use the FromArgb method to assign colors. For example, you can set the background
of a form to an interesting color with the statement
Me.BackColor = Color.FromArgb(45, 152, 99)
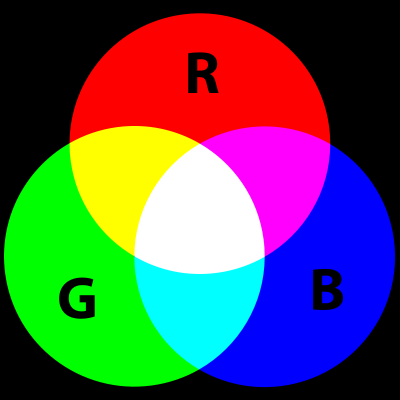
- The FromArgb method takes 3 parameters. All three parameters must be integers in the range 0 to 255. The first parameter refers to the amount of
red, the second refers to the amount of green and the third refers to the amount of blue. For example, to make the color blue, you would use the values 0, 0, 255 meaning that the resulting color has no red, no green and the maximum amount of blue. Using red, green and blue to create other colors is called the RGB additive color model which is used in many computer applications besides Visual Basic as well as your own eyeballs. To create the color, black use the red, green, & blue values of 0, 0, and 0. To create the color white, use the red, green, & blue values of 255, 255, & 255. Other colors can be created by mixing amounts of red, green, & blue. For example, you can see below that purple results from combining red and blue. Yellow results from combining red and green. Cyan results from mixing green and blue.
- Here are websites that can help you with RGB values of interesting colors - http://www.cloford.com/resources/colours/500col.htm & RGB color picker
Objective #4: Use the computer graphics coordinate system.
- Each object in your program has a location on the form based on a graphics coordinate system similar to how you graph points and lines on graph paper in math or geometry class.
In Visual Basic's coordinate system, the x-axis values range from 0 to 300 as you follow across the screen from left to right.
However, the y-axis (i.e. the vertical axis) is upside-down compared to the y-axis that you study in math and geometry classes. In VB, the y-axis values range from 0 to 300 as you go down the screen from the top.
- The width and height of the default size of a form are roughly 300 pixels.
- You can think of the graphics coordinate system to be labeled like this. With several points plotted as examples. When you plot a point in a graphics coordinate system, you always print the x-coordinate first followed by the y-coordinate.
- The properties Me.DisplayRectangle.Width and Me.DisplayRectangle.Height can be used to obtain the accurate dimensions of the form.
Objective #5: Use the DrawLine, DrawRectangle, DrawEllipse &
other methods.
- You can use the following drawing methods in the Form1_Paint method to draw graphics directly onto the form without using objects such as PictureBoxes.
- DrawString
- You can print a word on the form using the DrawString method as
in
e.Graphics.DrawString("Tic Tac Toe", New Font("Arial", 26), Brushes.Black, 100, 50)
where the text "Tic Tac Toe" will be printed in Arial font with size 26 and placed in such a way that it's top-left corner has the coordinates of 30, 40
To make the text bold use
e.Graphics.DrawString("Tic Tac Toe", New Font("Arial", 26, FontStyle.Bold), Brushes.Black, 100, 50)
- DrawLine
- You can draw a line segment with the DrawLine method.
e.Graphics.DrawLine(Pens.Black, 0, 50, 200, 50)
In this example, a black line will be drawn from the starting point (0, 50) to the end point (200, 50). That is, 0 is the x-coordinate of the one endpoint and 50 is
the y-coordinate of that endpoint. The x-coordinate of the other endpoint is 200 and 50 would be that endpoint's y-coordinate. Here is a picture of the line that would be drawn
To draw a line with more thickness, you can make this modification
e.Graphics.DrawLine(New Pen(Color.Black, 2), 0, 50, 200, 50)
where the 2 specifies a thicker pen.
- Here is an image with an additional red horizontal line drawn with this statement
e.Graphics.DrawLine(Pens.Red, 100, 100, 300, 100)
- Notice in the two statements which draw horizontal lines that the 2nd and 4th number parameters in the parentheses are identical. This shows that the the y-coordinates for the endpoints of a horizontal line are the same.
e.Graphics.DrawLine(Pens.Black, 0, 50, 200, 50)
e.Graphics.DrawLine(Pens.Red, 100, 100, 300, 100)
- Vertical lines can be drawn in the same way as horizontal lines with the DrawLine method although the 1st and the 3rd number parameters are identical with vertical lines.
- Here is an example of a blue vertical line added to the set of lines above
e.Graphics.DrawLine(Pens.Blue, 100, 100, 100, 200)
- Here is an example of a tic tac toe board with a green X that is drawn with the following DrawLine statements
e.Graphics.DrawLine(Pens.Black, 50, 100, 200, 100) ' top horizontal line
e.Graphics.DrawLine(Pens.Black, 50, 150, 200, 150) ' bottom horizontal line
e.Graphics.DrawLine(Pens.Black, 100, 50, 100, 200) ' left vertical line
e.Graphics.DrawLine(Pens.Black, 150, 50, 150, 200) ' right vertical line
e.Graphics.DrawLine(Pens.Green, 50, 50, 100, 100) ' part of X
e.Graphics.DrawLine(Pens.Green, 50, 100, 100, 50) ' part of X
- You can create your own Pen (or Brush) and save it as a variable to be used in future DrawLine (or other Draw... or Fill... commands). In this example
Dim myBlackBrush As New SolidBrush(Color.FromArgb(0, 0, 0))
e.Graphics.FillRectangle(myBlackBrush, 20, 20, 100, 20)
or
Dim myBlackPen As New Pen(Color.FromArgb(0, 0, 0))
e.Graphics.DrawRectangle(myBlackPen, 20, 20, 100, 20)
- DrawRectangle
- The DrawRectangle command allows you to efficiently draw a whole rectangle with one statement rather than using four separate DrawLine statements. For example
e.Graphics.DrawRectangle(Pens.Black, 50, 100, 200, 150)
would draw a rectangle that has a top, left position at (50, 100) where 50 is the coordinate on the x-axis and 100 is the coordinate on the y-axis.
The third number in the parentheses represents the width of the rectangle, 200 pixels in this case.
The last number represents the height of the rectangle, 150 pixels in this case.
Again, you can replace Pens.Black with something like New Pen(Color.Black, 2) in order to make a thicker outline around the rectangle.
- FillRectangle
- The FillRectangle command allows you to draw a rectangle that is filled in with color. For example
e.Graphics.FillRectangle(Brushes.Black, 50, 100, 200, 150)
would draw a solid, black rectangle. That position and size of the rectangle are determined with the numeric parameters in the same way as the DrawRectangle. Notice that you must use a brush rather than a pen with this method.
- DrawEllipse
- An oval can be created using the DrawEllipse method. For example, the statement
e.Graphics.DrawEllipse(Pens.Black, 50, 100, 200, 150)
would draw a black oval that is bounded by a rectangle with a top-left corner at 50, 100 and a width of 200 pixels and a height of 150 pixels.
A perfect circle can be created using the DrawEllipse method as long as the last two parameters are equal. For example, the statement
e.Graphics.DrawEllipse(Pens.Black, 50, 50, 100, 100)
would draw a black circle that is bounded by a rectangle with a top-left corner at 50, 50 and a diameter of 100. For a circle, the last two parameters will be equal since the width and the height of a perfect circle are always equal. In other words, the diameter of the circle is the same no matter where or how you measure a circle.
- Here is an example of a tic tac toe board similar to the one above but with an O placed in the middle
e.Graphics.DrawLine(Pens.Black, 50, 100, 200, 100) ' top horizontal line
e.Graphics.DrawLine(Pens.Black, 50, 150, 200, 150) ' bottom horizontal line
e.Graphics.DrawLine(Pens.Black, 100, 50, 100, 200) ' left vertical line
e.Graphics.DrawLine(Pens.Black, 150, 50, 150, 200) ' right vertical line
e.Graphics.DrawLine(Pens.Green, 50, 50, 100, 100) ' part of X
e.Graphics.DrawLine(Pens.Green, 50, 100, 100, 50) ' part of X
e.Graphics.DrawEllipse(Pens.Orange, 100, 100, 50, 50) ' O
- FillEllipse
- The FillEllipse command allows you to draw a filled oval or circle. For example
e.Graphics.FillEllipse(Brushes.Black, 50, 100, 200, 150)
would draw a solid, black oval. That position and size of the rectangle are determined with the numeric parameters in the same way as the DrawEllipse. Notice that you must use a brush rather than a pen with this method.
- You will not be tested on the following methods in this object but they may be useful in projects or assignments.
- DrawPolygon
- The DrawPolygon method can be used to draw triangles, quadrilaterals, pentagons, etc.
e.Graphics.DrawPolygon(Pens.Blue, {New Point(50, 50), New Point(50, 200), New Point(100, 200)})
A triangle is drawn with the code segment above. You can add more points in order to increase the number of sides of the polygon.
- FillPolygon
- A filled polygon can be drawn with the FillPolygon method.
e.Graphics.FillPolygon(Brushes.Blue, {New Point(50, 50), New Point(50, 200), New Point(100, 200)})
A filled in triangle is drawn above. Notice that you must use a Brush instead of a Pen.
- DrawLines
- The DrawLines method (which is different from the DrawLine method which does not end with an s) allows you to draw a bunch of line segments with one statement. You must first declare an array of points. Later in this course, we will study arrays and objects such as Points. But for now, all you need to realize is that you can specify as many points in the Dim statement as you'd like. The DrawLines method will "connect the dots".
e.Graphics.DrawLines(Pens.Red, {New Point(100, 50), New Point(50, 50), New Point(50, 100), New Point(100, 100), New Point(100, 150), New Point(50, 150)})
The number five is drawn by the code above.
- DrawCurve
- The DrawCurve method allows you to draw a smooth curve through a set of points. Similar to how the DrawLines method above will "connect the dots", the DrawCurve method connects the dots with a smoother line. For example, the statement
e.Graphics.DrawCurve(Pens.Red, {New Point(50, 50), New Point(50, 100), New Point(100, 125), New Point(140, 125)})
would draw a curve formed by smoothly connecting the listed points. The more points that you identify and include in the statement, the smoother the curve will be.
- DrawClosedCurve
- The DrawClosedCurve method connects the dots like the DrawCurve above but it also connects the first dot with the last one.
e.Graphics.DrawClosedCurve(Pens.Red, {New Point(100, 50), New Point(50, 50), New Point(50, 100), New Point(100, 100), New Point(100, 150), New Point(50, 150)})
- FillClosedCurve
- The FillClosedCurve method works like the DrawClosedCurve method only it fills in the region with solid color.
e.Graphics.FillClosedCurve(Brushes.Red, {New Point(100, 50), New Point(50, 50), New Point(50, 100), New Point(100, 100), New Point(100, 150), New Point(50, 150)})
Notice that you must use a Brush instead of a Pen.
- DrawArc
- With the DrawArc method you can draw an arc. By defining the coordinates of its bounding rectangle and setting the initial angle and the sweep angle (in degrees), you can trace out a smooth arc.
e.Graphics.DrawArc(Pens.Green, New Rectangle(0, 0, 100, 100), 0, 180)
creates a half circle inside the area outlined by the square with the upper-left corner of (0, 0) and width of 100. The 0 is the initial angle on the unit circle (3:15) and the amount of arc that is drawn is 180 degrees.
- Review this more complete study guide, written by a former student, to learn about the DrawArc method.
- DrawBezier
- The DrawBezier method can be used to draw curves similarly to how the Pen tool is used in graphics programs like PhotoShop.
e.Graphics.DrawBezier(Pens.Black, New Point(0, 150), New Point(50, 0), New Point(150, 100), New Point(200, 200))
- You can also draw an object to a buffer area using the form's CreateGraphics method. You are not responsible for knowing the CreateGraphics method
on tests or exams. Here's an example though:
Dim objGraphics As Graphics
objgraphics = Me.CreateGraphics
objgraphics.Clear(System.Drawing.SystemColors.Control)
objgraphics.DrawLine(System.Drawing.Pens.Chartreuse, 0, 0, 300, 300)
objgraphics.Dispose()
See this reference http://www.samspublishing.com/articles/article.asp?p=25723&seqNum=5&rl=1
- The statement
e.Graphics.SmoothingMode = Drawing2D.SmoothingMode.AntiAlias
can be used to make some of the methods above draw smoother lines.
- The command Me.Refresh() can be used to call the Paint method. Me.Update() may also work.
- To display text (or any shape) on a slant, you can use the e.Graphics.RotateTransform method.
- Here is another demo program that illustrates how the methods can be placed into separate methods for increased reusability: Comic Strip Graphics Methods
- There are many other drawing methods that come from the Graphics class . You can learn how to use them by browsing the VB API. An API is
a list of classes and methods in a programming language. An API is meant to be used as a reference to professional programmers. Click the menu command View/Object Browser and then click the plus symbol
next to System.Drawing and the next System.Drawing entry. Highlight the Graphics class and browse through the window pane on the right to see other interesting drawing
methods that could be used in the example above.
Objective #6: Embed video files in a VB project. (You will not be tested on the following information in this objective but it may be useful in projects or assignments.)
- In order to use a movie in a VB program, you must first create the Flash movie itself. First, place the video file in your project's bin/Debug folder folder.
- Add a reference to the COM ???? control. Right-click on the tool box. Select “Choose Items…”. Select “COM Components”.
Select “?????”. Click OK.
- A new tool named ??????? now appears in your toolbox. Double-click the toolbox icon to place the Flash object on your form. The object will be named ?????1
- Use the following code to play the Flash movie
????1.Movie() = Application.StartupPath & "\???.mp4"
?????1.Play()
Later you can stop the video with the command
?????1.Stop()
When you are finished using the movie in your project, you should clear it out of the memory with
??????1.Dispose()